Monday, July 13, 2015

Installing Microsoft Windows 8...

Installing Microsoft Windows 8

Windows 8 :
System Requirements :

If you want to run Windows 8 on your PC, here's what it takes:
·         1 gigahertz (GHz) or faster 32-bit (x86) or 64-bit (X64) processor 
·         1 gigabyte (GB) RAM (32-bit) or 2 GB RAM (64-bit)
·     16 GB available hard disk space (32-bit) or 20 GB (64-bit)
·     DirectX 9 graphics device with WDDM 1.0 or higher driver

What you will need:
  • Windows 8  Boot Disk
Make sure your computer is set to boot from a CD.

To check this go into your BIOS. From there go to "Boot" and go to "Boot Priorities". Make sure CD-ROM is set to boot first and you're all set.

Step 1:

Ensure you have a network cable connected, restart your computer, and boot from the DVD drive.

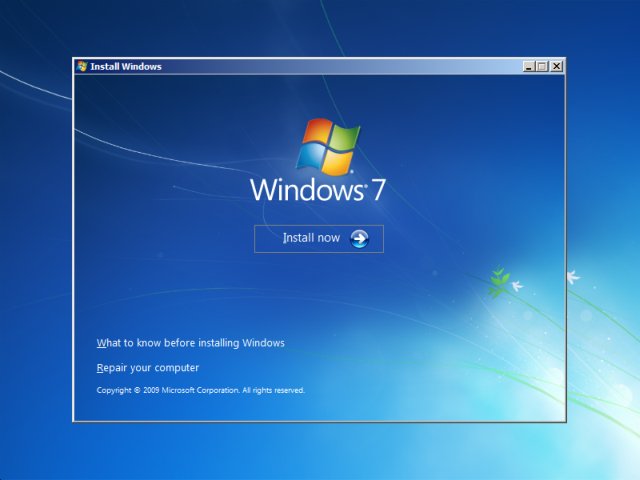
The DVD will begin to load up, and you'll be presented by the following screen as the installer starts.


Step 2:
Once loaded you will see the following screen.


Select your location, keyboard and regional language settings as required and click "next" to continue and you'll see the following box:

Click "Install now" to continue with the installation.

Step 3:
You'll then be asked to provide the product key to activate Windows.

Enter the product key as written in the screenshot above. For the sake of clarity, the product key is
 XXXXX-XXXXX-XXXXX-XXXXX-XXXXX for both the 32-bit and 64-bit versions.

Once you have entered the product key, click "next" to continue to the next step.

Step 4:
Before you can proceed with the setup any further you're required to accept Microsoft's license terms, as below.


Read the terms, and once you're happy, tick the "I accept the license terms" box, and click "next" to continue to the next step.

Step 5:
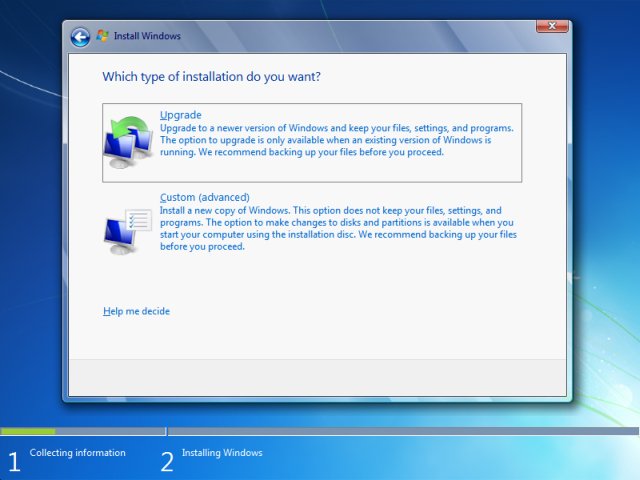
You will be greeted with the following screen.

For the purposes of this guide, we'll assume you are performing a fresh installation of Windows 8 Release Preview. Therefore, this tutorial covers the "Custom" option which will install a fresh copy of Windows 8 Release Preview onto a clean hard drive, without backing up and restoring any existing files or settings.

The first option, "upgrade" will allow those running previous versions of Windows to upgrade to Windows 8 whilst keeping all files, settings and applications during the setup of the new operating system.

Step 6:
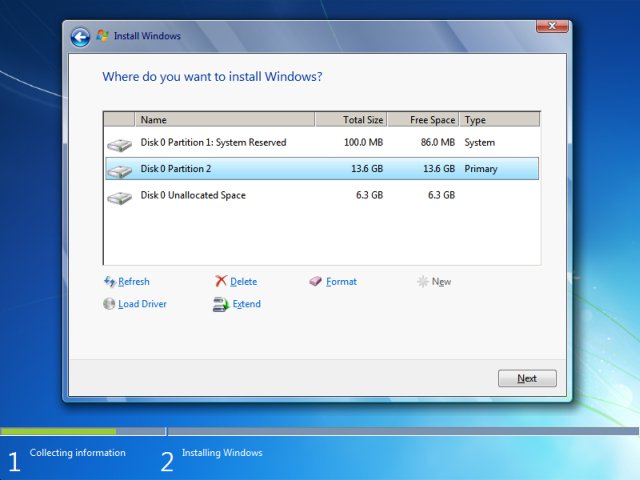
The setup will then continue and start the disk manager as below.


Select the correct drive to use for the installation of Windows 8 Release Preview, and click "next" to continue. For those trying this in a Virtual Machine, 20-25GB of hard drive space is more than adequate.

Note: This step is the last point in which you can abort the installation without permanent data loss to drives. Please ensure you have working backups before proceeding further.
Note -
  • Windows 8 recommends at least 15 GB (32-bit) or 20 GB (64-bit) of hard drive space.
  • 1000 megabytes (MB)= 1 gigabyte (GB).


Step 7:
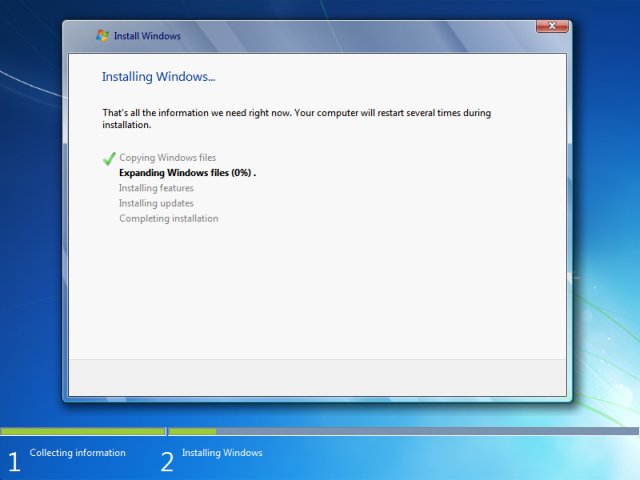
Windows setup will then begin to install Windows 8 Release Preview to the hard drive, and will work through several stages as detailed below.


The installer may restart during the installation stage as it configures the computer to run the new operating system.

Step 8:
Once complete, it will reboot again and setup the computers devices and finalize the installation, as below.


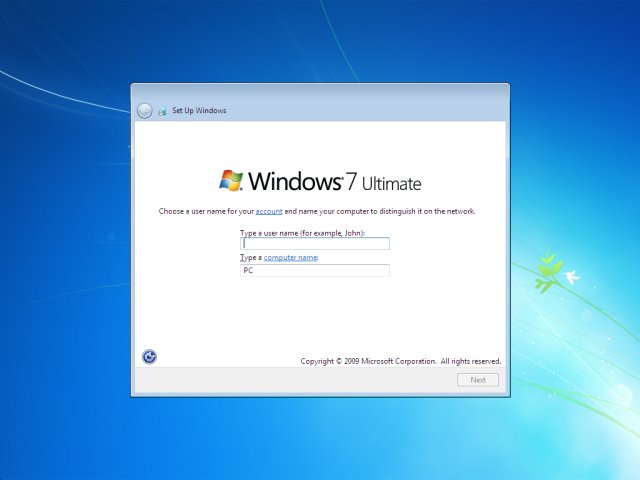
Once this stage has finished, you will be greeted with the following screen.

Select your preferred colour scheme for Metro, and then name your computer. The PC name is used to identify the computer on local networks and ideally should be named so that other users your network can identify who the computer belongs to. Then click "next" to proceed.

Step 9:
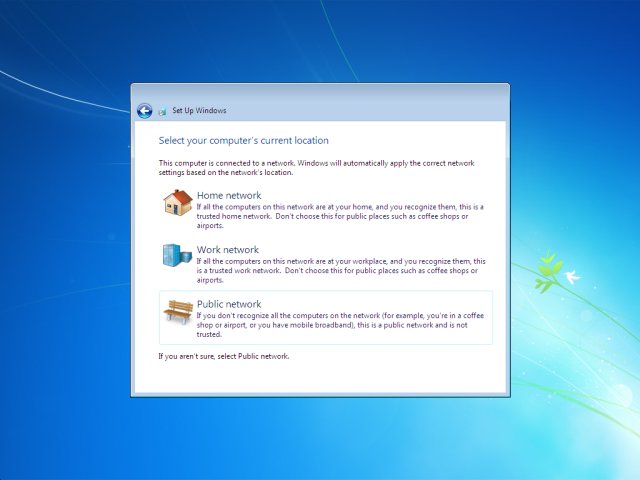
You will then be greeted with the following window.

At this point you can specify the final settings required in the configuration of your new Windows installation. You can either choose "use express settings" or click "customize" to change the express settings.

If you are unsure, it is best to choose the first option. The installer will then configure the final settings and move onto the next step.

Step 10:
The next step asks you if you wish to sign into your PC using a Windows Live account.

Unlike previous versions of Windows, Microsoft's new operating system heavily integrates the Redmond-based firms Windows Live features, including messenger, contacts, calendar and mail.

Signing in using your Windows Live account also offers Windows 8 users additional benefits like the ability to download additional apps from the Windows Store and automatic synchronization of all your Windows 8 computers so they look and feel the same regardless of which one you're using.

Note: Your Windows Live ID also becomes your username for Windows 8 Release Preview, and uses your Windows Live ID password to log in.

Enter your Windows Live ID, and click "next" to continue.


You will then be asked for your password for your Windows Live account. Click "next" to continue.


The final step of integrating your Windows Live account with your new installation of Windows 8 Release Preview requires you to provide additional verification information. For those that have previously set this up, the fields will be completed already. Verify they are correct, or add the required information and click "next" to continue.

Step 11:
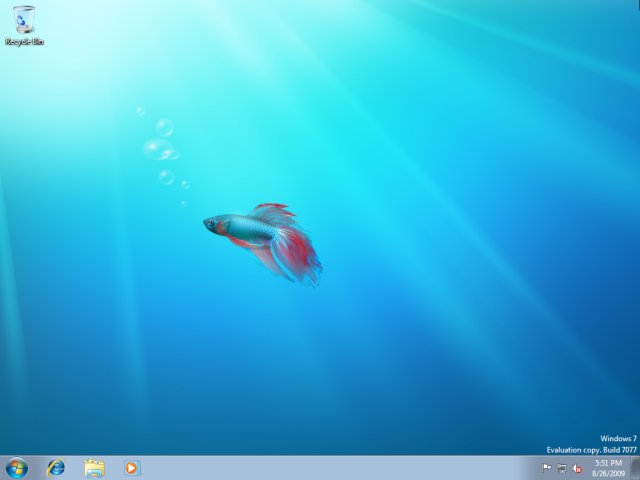
Windows 8 Release Preview will then complete its final configuration.

Once complete, it will then boot into Windows for the first time, as below.


Installation is now complete, and you can enjoy your new OS and begin exploring its features.

Installing Microsoft Windows 7…


Windows 7

System Requirements :


If you want to run Windows 7 on your PC, here's what it takes:
·         1 gigahertz (GHz) or faster 32-bit (x86) or 64-bit (X64) processor 
·         1 gigabyte (GB) RAM (32-bit) or 2 GB RAM (64-bit)
·         16 GB available hard disk space (32-bit) or 20 GB (64-bit)
·         DirectX 9 graphics device with WDDM 1.0 or higher driver

What you will need:
  • Windows 7  Boot Disk
Make sure your computer is set to boot from a CD.

To check this go into your BIOS. From there go to "Boot" and go to "Boot Priorities". Make sure CD-ROM is set to boot first and you're all set.

1. Turn ON your PC and Press ‘F2′ Continuously. There will come up and option to boot through CD/DVD. Select that option. Windows will start loading its files.

2. Now you will get the Windows Setup Window. This is the part to select Language for your windows. Select ‘English’ and click Next. Also there will be a ‘INSTALL NOW’ button. Click on it and proceed to next step.

3. There will be a license agreement. Check on ‘I ACCEPT’ and proceed to NEXT. After that there will be an option to install windows. ‘UPGRADE’ and ‘CUSTOM’. Right now we are installing a clean version so Click on CUSTOM.

4. In this step you will do partitioning of your drive. Be careful, this is the most important part of the Installation. In this you will allocate spaces to your drive. If you want to create a new drive, simply click on a drive and then click ‘NEW’. A new drive will be created.

Note -
  • Windows 7 recommends at least 15 GB (32-bit) or 20 GB (64-bit) of hard drive space.
  • 1000 megabytes (MB)= 1 gigabyte (GB).

5. When you have created the drives, Simply Select the drive in which you want to install windows. Click ‘Format’, this will erase all the previous data on you that drive. Click on ‘NEXT’ to proceed.

6. Now you windows will start installing its files. Grab a cup of coffee and wait for a few minutes while it install. During this process don’t plug in or off your device. It might cause interruption and you might loose your data and have to begin the process all over again.

7. Now when you files are installed. Your PC will be rebooted and now you will see is a ‘User Settings’ Screen. Simply add your Name and password and proceed to ‘NEXT’

8. In this step you have to activate your windows. Simply look at the back of your Windows CD/DVD cover there will be a PRODUCT KEY. Add this key into your PC and Click ‘NEXT’.

9. Now you have Installed you windows. Give the desired information the Windows Step guide will ask, like Time Zone, Update Timing and Your Computers location. There are three types of location. ‘WORK’, ‘PUBLIC’ and ‘HOME’. Select on anyone of the them according to your location. It only add sharing security according to your location.

10. Last Step – Congratulations:-
 You have installed you windows. Now you can see is your desktop. It is simple to use, setup your desktop and enjoy!


Thursday, June 19, 2008

Installing Ubuntu (Linux).......


About Ubuntu :

Ubuntu is a community developed, Linux-based operating system that is perfect for laptops, desktops and servers. It contains all the applications you need - a web browser, presentation, document and spreadsheet software, instant messaging and much more.

Installing Ubuntu (Linux).......


Ubuntu (Linux)

What you will need:

  • Ubuntu (Linux) Boot Disk

Make sure your computer is set to boot from a CD.

To check this go into your BIOS. From there go to "Boot" and go to "Boot Priorities". Make sure CD-ROM is set to boot first and you're all set.

1. Insert the Ubuntu 7.04 boot disk and start up your computer. The boot screen will come up next. Highlight the Start or install Ubuntu choice and press Enter. Be patient while the loader goes back and forth. This may take a few minutes.

2. After that Ubuntu will load up and you will be presented with a very bare screen. Double click on the Install icon to begin setting up Ubuntu.

3. After you double-click on the install icon it will first ask you to pick your preferred language. Choose one and click Forward.

4. The next screen will ask you to pick a location near you for time purposes.

5. Now to choose your keyboard layout. Most commonly it is U.S English.

6. Once again it is time to partition your hard drive. From this screen make sure that Manual is checked and click Forward.

Now you should see a screen entitled Prepare partitions. We are now going to create the partition in which Ubuntu will run on plus a file called "SWAP" to act as virtual memory.

7. First let's create the SWAP file. Click on New partition. The SWAP file won't need a whole lot of space to run, so just give it 512 megabytes which will be more than enough for it to run. Now just change the Use as: option to SWAP while keeping the type of partition as Primary and the location as Beginning. Click OK to add it.

8. Now make sure free space is highlighted and click New partition again. This time we will add the hard drive space for Ubuntu to use. Give it what ever amount of space you would like depending on your hard drive space. Just remember to give it at least 2 GB though I recommend you give it much more. Now change the Use as: to ext3 and keep the rest of the settings the same. Click OK to add.

9. Next right-click on the partition ext3 and click edit. From here change the mount point to a forward slash / and click OK.

10. You should see a screen similar to this one, but with the partition NTFS on it. Last thing to do before proceeding is check the box next to ext3 to format and then click Forward.

11. The next screen is going to ask you if you want to import any accounts you may have on Windows XP. If you want to do it, if not just proceed.

12. Time to enter your personal information. Just as a note: your login has to be all lowercase letters.

13. Now just confirm all the information and click Install to start enjoying the beauty of Linux!

Congrats! You have fully installed Ubuntu (Linux) on your system.......

Home Page : http://www.ubuntu.com/

Download now - Download the Ubuntu, Edubuntu or Kubuntu CD installer to your computer now.

Request a free CD - Request a free Ubuntu, Edubuntu or Kubuntu CD from Canonical.